Wednesday, January 30, 2013

"You're a Hoot" Valentines Cookies

Whooooo will be my Valentine?

Yeah, I know. Silly aren't I?  Don't you just love silly valentine's sayings? They make me giggle.

It's the simple things in life that make me happy.

Ok that's a lie....SHOES make me happy....and handbags.....and jewelry......and clothes.....

Ya know what, forget what I said about simple things making me happy. I lied.

Great, now I'm a liar and everyone knows. Please still be my friend. I'm lots of fun.....and I make cookies!

So WHOOOO wants to make Owl cookies with me? Sorry couldn't help myself.

Ok really......let's decorate cookies.
Roll out your cookie dough and cut out some circles. Using a leaf cutter make some indentions for the owl's wings. If you are good at doing things free handed then you can skip making the indentions. Bake cookies according to your recipe and allow to cool. 

 After your cookies are baked and cooled. Use a #2 tip and red piping icing to outline wings. 

Fill in wings and let dry about an hour. 
Using a #2 tip and pink piping icing add rows of scallops for feathers and outline owl's body.

Fill in feathers first. Alternate sections and give about 20 min to dry in between. 
Then fill in the rest of the body. You could skip this step and just fill the entire body in pink without the scalloped feathers.
Let cookie dry.

Using a #12 tip and thicker than flood consistency icing, add two big eyes. Then use a #2 tip to add a black dot to the eyes. 
Outline wings in red and scallops in pink.

With a #2 tip add an orange beak and feet.
Let cookie dry completely.


There you have it....a cute owl for whooooever you want to be your valentine.

For other cute Owl Cookies:
The Adventures Of Sweet Sugerbelle: "Owl" Always Love You Cookies
The Bearfoot Baker: Owl Cookies

Hope everyone's having a fabulous week!


Monday, January 28, 2013

Love Bird Cookies

Ok, aren't these the cutest cookies? I may be a bit biased. After all I did make them.

But, they are cute. You know they are.

I hope everyone had a great weekend.  My weekend was pretty fabulous. We took our four year old daughter to her first parade. You would think that she would have been to one already, but nope. She was born in Germany. This is the first year we've been in town to go.

She did pretty good. She screamed and waved for beads like a true New Orleans girl......but she quit on us way to early. Lucky for us, our friends brought their camper and had it parked for tired children and small babies.

My hubby was all too happy to lay back in a chair and do kid watch. He's not from New Orleans....he's a Texas boy.

He'll never like parades like I do. It's a sad thing.

So that was my weekend....screaming and acting a fool for some cheap beads.

These cookies were pretty easy to make. Wanna learn how?

Ok here's what you do.....
 Roll out cookie dough with a heart shaped cookie cutter. Need a good cookie recipe? You can get mine here. Then cut the hearts in half. I used my dough scraper to cut these. A pizza cutter would work well also.

With a food safe marker and a small heart cutter, trace half of a heart on the cookies towards the bottom center. This will make the birds' wings. Tracing the shape keeps things symmetrical.

 With a #2 tip and red royal piping icing, outline each bird's wing. To get this color red I used Tulip red and a tiny bit of Super Red Americolor gel.

Fill in wings with flood consistency red royal icing. Let dry. This helps prevent the colors bleeding.
After the red wings are dry, outline bird's body with blue piping consistency royal icing and a #2 tip.

With flood consistency blue royal icing, fill in bird's body. Let dry overnight.

Using a #12 tip and a little thicker than flood consistency icing, add whites of eyes.


While whites of eyes are still wet, pipe a blue dot using a #4 tip and blue royal icing. I used the same consistency as the whites of eyes.


Add black dot to eye with a #2 tip and black royal icing. Once again same consistency as white and blue of eye.
Add an orange beak. Let cookie dry.


 Have a Happy Monday!


Friday, January 25, 2013

Royal Icing Hearts

Slade had his four month old check up this week. You mom's know what that means....SHOTS! A mother's nightmare.   Luckily this time he only received two injections.

The first one he didn't even let out the slightest whimper....oh but the second one he was not pleased with. It was the saddest little cry I ever heard. Totally broke my heart.

He's over it now and on to being a happy four month old. Smiling at everything. He even giggles...but only at me. I'm his favorite. He told me this.

I heard him.

It's true.

Well even if he didn't actually say it because he can't say words yet, we all know it's true. You can just tell.


Pay no attention to the picture of him sleeping on daddy with his favorite toy. I'm still his favorite. Daddy is just snuggly.  I fall asleep if I lay on him too. He's good like that. 

This week I made tons of cookies. Which means tons of icing.....leftover icing. Since I had a good bit of red left over I thought I'd put it to good use and make some royal icing hearts. They were really easy to make.

Wanna give it a try?

Ok, put your red icing in a bag with a #2 tip. If you want bigger hearts, use a bigger round tip. I used a #2 for mine.

Get out a sheet of wax paper.


Begin by squeezing a dot onto the wax paper, then stop squeezing as you pull down.


Then squeeze another dot next to first one....stop squeezing and pull down forming a heart.


Repeat this a five thousand times or until you're sick of piping hearts. It's totally easy.

Let these dry for a day. You want to be sure they are completely dry. Then just simply peal them off the wax paper. Store them in an airtight container and use on cookies, cupcakes or whatever else you want to add little hearts to.

 Hope y'all have a totally fabulous weekend!

Thursday, January 24, 2013

Monkey Cookies

Monkeys and Banana's..... My kids have been acting like little monkeys and I feel like I'm going bananas. 


Really and truly bananas. Like, lock me in a padded room bananas. 

Then, I keep thinking I'm seeing things. I swear I can see something crawling from the corner of my eyes, only to look and it's not there. 

See...I'm officially loosing it. I think it's lack of sleep syndrome. My baby sleeps through the night but, I'm up......wide awake.....making cookies.

Hey, it's when I can truly be alone in my own little world. Don't judge.

Wanna see how to make these cute little monkeys? 

To make these cute little cookies you will need:
Monkey cookies, baked and cooled. {I bought my cutter here.}
Brown royal icing
Pink royal icing
White royal icing
Cream royal icing

With a food safe marker outline an oval shape onto bottom center of cookie.

 With cream royal icing and a #2 tip, outline the oval shape you drew.


Fill in oval with cream flood consistency royal icing. Next take some pink 15 second royal icing and spread it on the cookie with an offset spatula. Outline cookie with brown royal icing. Let dry.

Outline center of ears with brown royal icing. 

Fill in brown section of cookie with brown flood consistency royal icing. Let dry overnight.

With 15 second icing add whites of eyes.

With brown piping icing add mouth and outline cookie.
Add two black dots of icing to the eyes. 

 You can also add a little flower or bow by the monkey's ear and make girl monkeys. 

Hope everyone's having a happy Thursday!


Tuesday, January 22, 2013

Mardi Gras Petit Fours


Last week over at Confessions of a Cookbook Queen, Kristan made the cutest red velvet heart petit fours

Which got me thinking.....I haven't had a petit four in like forever! I didn't feel like going to the bakery to buy an overpriced mini cake when I could just make a bunch for next to nothing. After all, that money could be better spent.....like on SHOES!

I altered a recipe I found online to make it taste more like the ones from our local bakery. 

Now I must warn you, if you don't like things to get messy then this is not for you. This is a messy thing to make. Lucky for me, I have little cleaning fairies who I call children to help me clean up the mess. They want petit fours....I want a clean kitchen. It's a win win situation.

Almond Sour Cream Cake
Ingredients:
1 boxes white cake mix
1 cups flour
1 cups granulated sugar
1/4 tsp salt
1 1/3 cups of water
1/8 cups oil
1 tsp vanilla
1 1/2 tbsp almond emulsion 
1 cups sour cream (room temperature)
4 lg egg whites

Preheat oven to 325˚

1. In your kitchen aid mixer or a bowl, combine cake mix, flour, sugar, salt and mix until combined. 

2. Add water, sour cream and oil and mix until combined. 

3. Add almond and vanilla, mix.

4. Add eggs whites one at a time until incorporated thoroughly. 

5. Mix until there are no lumps, about 2 minutes.

6. Pour cake mix into a greased and floured pan. I used a 9X13 pan. Place into a preheated oven. Bake @350˚ for about 50 min or until a toothpick comes out clean. Bake time varies with ovens. Allow cake to cool.


Glaze
Ingredients:
4 1/2 cups confectioners sugar
1/4 cup water
1/4 cup light corn syrup
1/2 tsp vanilla
1/2 tsp almond

Mix all ingredients in a mixing bowl until combined. Place in microwave about 1 min, maybe a little longer. Just like ovens, all microwaves are different. Mine gets pretty hot, fast. 


Cut out square shapes. I used a 2X2 square cutter. 

Place square pieces on a wired rack and place a cookie sheet under it. Pour warm glaze over cake pieces. Allow a minute or two, then pour another layer of icing. I did this two or three times.  

While cakes were still sticky I transferred them to a piece of wax paper and sprinkled with Mardi Gras colored sprinkles. Then allow the icing to set up. They will stay tacky for a few hours. 


This recipe was so worth all the sticky. The petit fours went in the matter of minutes. I'm sure my kids were wired at school. 


Tuesday, January 15, 2013

I Love Ewe Cookies


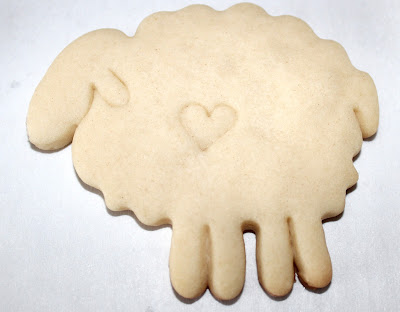
A while back I bought this cute little sheep cutter from Fancy Flours.

Finally, I'm getting around to using it. Better late then never right? These are perfect for a child's Valentine party.

I thought these cookies were simple enough that even the beginner could make them. It's not the fastest cookie to make. You must exercise some patience with drying in between, but the final outcome is worth it. I love the texture the dots give the cookie. Don't you?

Here it goes......

I Love Ewe Cookies

1. Start out with baked sheep cookies. If you don't have this exact cutter you can use a different sheep cutter. Just adjust steps as needed. 

2. Outline head of sheep using black piping consistency icing and a #2 tip. Switch out tips to a #3 tip and pipe legs on the sheep. 

3. With flood consistency black royal icing fill in head of sheep. Allow to dry.

4. After head is dry. Using white royal icing a little thinner than piping consistency add a dot for the sheep's eye. I used a #2 tip for this. Then with a #1 tip pipe a small black dot on top of the white one.

5. With red royal icing a bit thinner than piping consistency fill in the heart that is embossed on the cookie. If you are using a different cutter, simple make a heart in the center of the sheep cookie you are using.

6. With white icing (a little thinner than piping consistency) add dots all over the body of the sheep. Leaving a space between the dots. Allow the dots to dry about 30-40 min before applying next layer of dots.
*TIP.....Squeeze harder for larger dots and lighter for the smaller ones. I used a variety of sizes.
  **TIP....stay clear of the heart if it is not dry yet. Otherwise you have the mess you see pictured above. That can be avoided by allowing the heart to dry first.

7. Repeat adding layer of dots. Allowing them to dry 30-40 min before applying another layer. Do this until the entire body of the sheep is filled. 

The finished sheep! 
These sheep would also work well for a baby shower. Just simply change the red heart to blue or pink.


Friday, January 11, 2013

Metallic Dress Cookies


It's FRIDAY!!!!!!!!!!

I took a little break to recover from the holidays. I need a real vacation. I thought after I had the baby my life would just go back to normal...wake up, drink coffee, get kids to school, clean house, eat lunch, clean some more, pick up kids, clean some more, cook dinner, decorate cookies, blog, clean again, then off to bed.

Not happening! It isn't going that way. I certainly didn't think adding baby #6 would make that big of a difference. What's one more?  Apparently one more is like fifteen more. I'm frazzled! Don't get me wrong, he is a fantastic baby. He just ALWAYS wants to eat. Nursing is a full time job. My girls never nursed this much. Not to mention I am now a human pacifier. 

My schedule goes a little more like this now.....wake up, fall back asleep, wake up, drink coffee my teenage daughter has made me (God bless her), get kids to school, nurse baby, potty train toddler (that's an all day thing), get baby down for nap, pull out my hair because toddler wakes up baby, feed myself and toddler, nurse baby, pick up kids from school, nurse baby, throw dinner together, nurse baby....blah blah blah...it's now 2am and I've not made cookies and I can't blog!!!! 

I really think I got ten grey hairs last week. GREAT, now I have to squeeze in a hair appointment. Can you say stressed out?

So I took a step back to focus on the most important things in my life....my family. I had lots of snuggles with the baby. Spent time with the older kids. Still potty training the toddler....she's a bit slower than the other kids were. Things are getting into more of a system. I even got some baking and cookie decorating in! Life is good. 

Georganne of LilaLoa gave us a challenge on the first of January to make something without color. I thought...how perfect. Less colors to mix=more time to decorate! It was a win win. I'm not a fan of mixing icing....or the clean up after. I simply like to decorate cookies. 

These were the cookies I came up with for the challenge.

I'm going to show you how to make the dress in the middle.  The dress on the right was inspired from these cookies by Callye of Sweet Sugarbelle.


1. Bake cookies and allow to cool. I pieced the dress together using a heart and large party hat cutter.

2. With a #5 tip and piping icing, pipe a row of dots across bottom of cookie. Take a small damp paintbrush and stick it in middle of dot and pull toward you.

3. Pipe a second row of dots, repeating step #2.

4. Repeat this until you reach the top dress section. Leave room for the sash. 

5. Outline dress top with #2 tip and grey piping consistency icing.

6. Fill dress top with flood consistency grey icing. Let dry several hours.

7. Add a sash with white icing. I used icing that was a bit thicker than flood icing. Let dry over night. 
I made rose royal icing transfers and allowed them to dry overnight. I added the rose the next morning using a dot of piping icing and glued it onto the sash.

8. For a metallic sheen, spray cookie with Wilton color mist spray in silver. Let dry.


Shareaholic